What Is The Difference Between A Miter Cut And A Bevel Cut?
Author: E. Silva (aka Mr. Awesome - The Niche Specialty Expert)
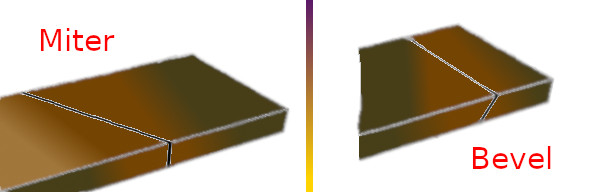
A miter – cut does not tend to get made at a usual 90 degrees ( or as a basic, 90 – degree cut, in other words ) . That, among a few other things, is the main difference between it and a bevel – cut. But let’s have a look at some more info here … you might learn a ton today, my friends ….
Now, then, first of all, let me make this next point quite crystal clear to all who are reading this —- the blade on a miter – cut is vertical. Yes, we are talking about a vertical cut from a vertical blade … easy enough, right? And also, on a bevel – cut, you will instead see that blade slightly tilted over. Interesting differences, right? There is more to be noting here, so please keep reading ….
Now, then, also, you will want to take quick notice of the simple fact that, if you want to get the best of both worlds here, you can opt for what is known as a compound – miter cut, which is basically just a hybrid cut of the two. It’s half – miter cut, and half – bevel cut, in other words. It’s pretty interesting, too … a unique kind of cut all on its own. Now when you adjust your saw and blade to make a miter – cut, the process looks a little different than for a bevel – cut, as well … here on a miter - cut, you want to start out by just simply and plainly flipping your miter’s lock level horizontally ( or in other words, in the up direction ) . You will then use your thumb to hold that detent level on the miter down. To get the right angle you want from there, you then rotate the saw … simple enough, it is not? It is even easier when you try it out for yourself, you will notice ….
You’ll find that, here, the lever drops right into position, most of the time … if you are using a more common angle. You then, at this point, simply just push that lock lever down once more. And voila … you have adjusted to make your cut. But on a bevel – cut, it’s a little different, as I mentioned …
Here, you start by flipping that lock lever up and then rotating the dial, as well as the saw itself ( to your ideal angle, of course ) . Then you push the lock lever down and keep it in that position before you cut … don’t forget to do that. And then, of course, check for any blade interference ( which can sometimes happen ) by looking at your fence area. That is how you adjust for a bevel – cut!
I hope you have enjoyed this post and noticed the subtle differences between the two cuts ….